
Most gaming GPUs spend much of their life doing nothing. The card that renders your games at 4K for a couple hours a night sits idle the other 20+ hours a day. At the same time, machine learning builders around the world are looking for exactly that kind of hardware to run inference workloads, data processing tasks, and LLM fine-tuning jobs.
Dispersed is the network that connects those two things: idle consumer GPUs on one side, builders who need GPU compute on the other, with RENDER tokens as the reward for making your hardware available.
This is a practical, start-to-finish walkthrough: From the hardware check before you install anything, to your first epoch payout. It's also an honest one. What you actually earn depends on your hardware, your uptime, and how much demand the network is matching to your machine in a given week. Nobody can promise you a fixed number before you've registered a node. Do not treat this as guaranteed income. Rather, think about it as a way to monetize hardware that's otherwise sitting idle.
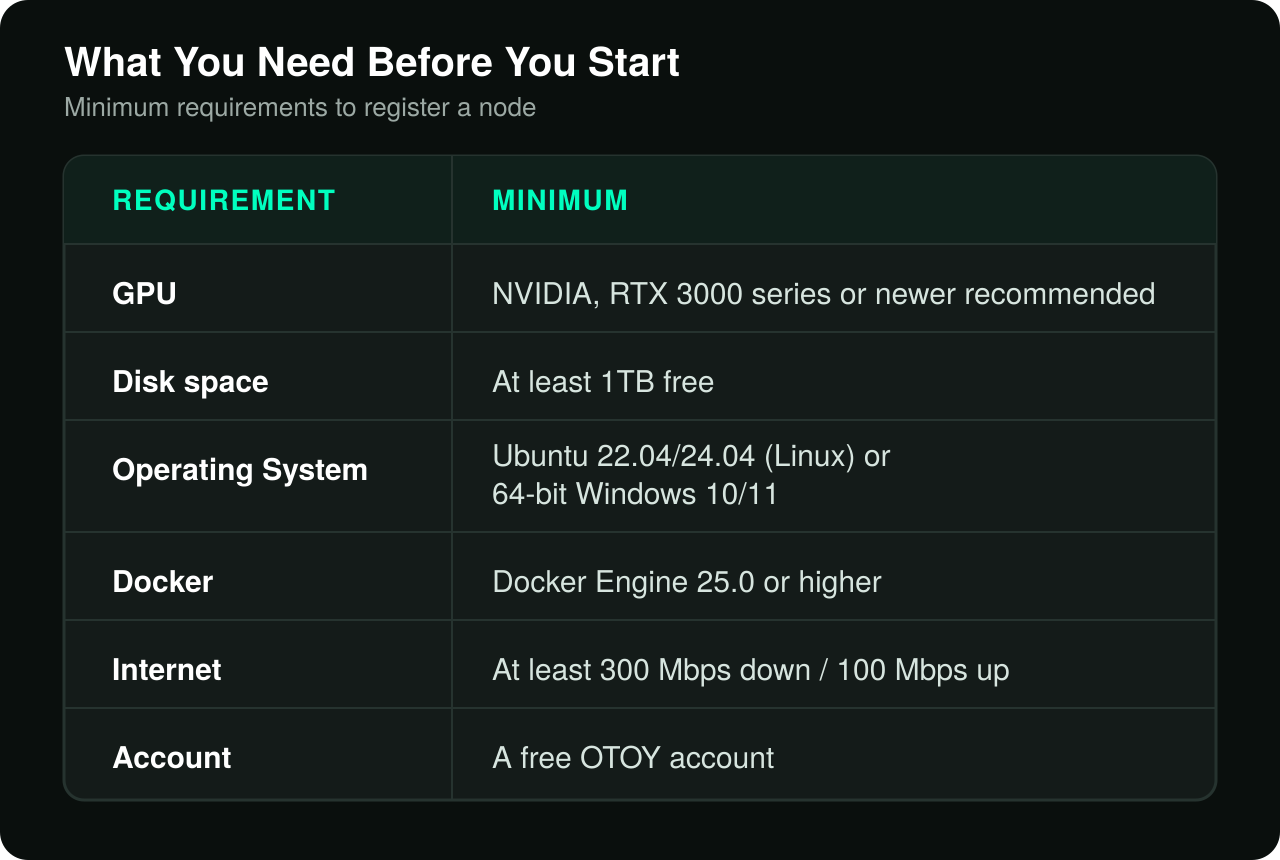
If your card is older than the RTX 3000 series, you can likely still register it, but expect a lower reward multiplier. More on that below.
1. Create an OTOY account if you don't already have one*.
2. Sign in to the Dispersed Console with Sign in with OTOY.
3. Navigate to API Keys in the sidebar and click Create API Key.
4. Set the Preset to Compute Node (this is the permission set Node Operators need; it's different from the Compute Consumer preset used by people submitting jobs).
5. Save both keys immediately: your `public_key` (starts with `pk_`) and your `secret_key` (starts with `sk_`). The secret key is shown exactly once. If you lose it, you'll need to generate a new one.
*OTOY is the Render Network ecosystem service provider that built and maintains the technology that runs both Render Network and Dispersed subnets.
The exact steps differ by platform, but the shape is the same: verify your GPU drivers, install Docker, and install the NVIDIA Container Toolkit so Docker can actually use your GPU.
On Linux (Ubuntu 22.04/24.04):
On Windows:
If any of this trips you up, the prerequisite and troubleshooting docs cover the specific error messages you're likely to hit (permission errors, driver/library mismatches, GPU not detected). Most of them have a one-line fix.
Once the prerequisites check out, download the `disNet` client from the Dispersed Console.
First-time registration (Linux example):
```bash
./disNet --register --pubkey pk_your_public_key --secretkey sk_your_secret_key
```
You should see a confirmation with a Node UUID, and the node will appear on the Dashboard page of the Console. You can register more than one machine. Each one earns independently.
Starting the client afterward (you only need `--register` the first time):
```bash
./disNet --pubkey pk_your_public_key --secretkey sk_your_secret_key
```
On Windows, launching `disNet.exe` the first time will prompt you for your public and secret key directly. No separate registration command is needed.
Your reward, issued in RENDER, depends partly on uptime, so a node that silently crashes overnight is lost money. Two practical steps:
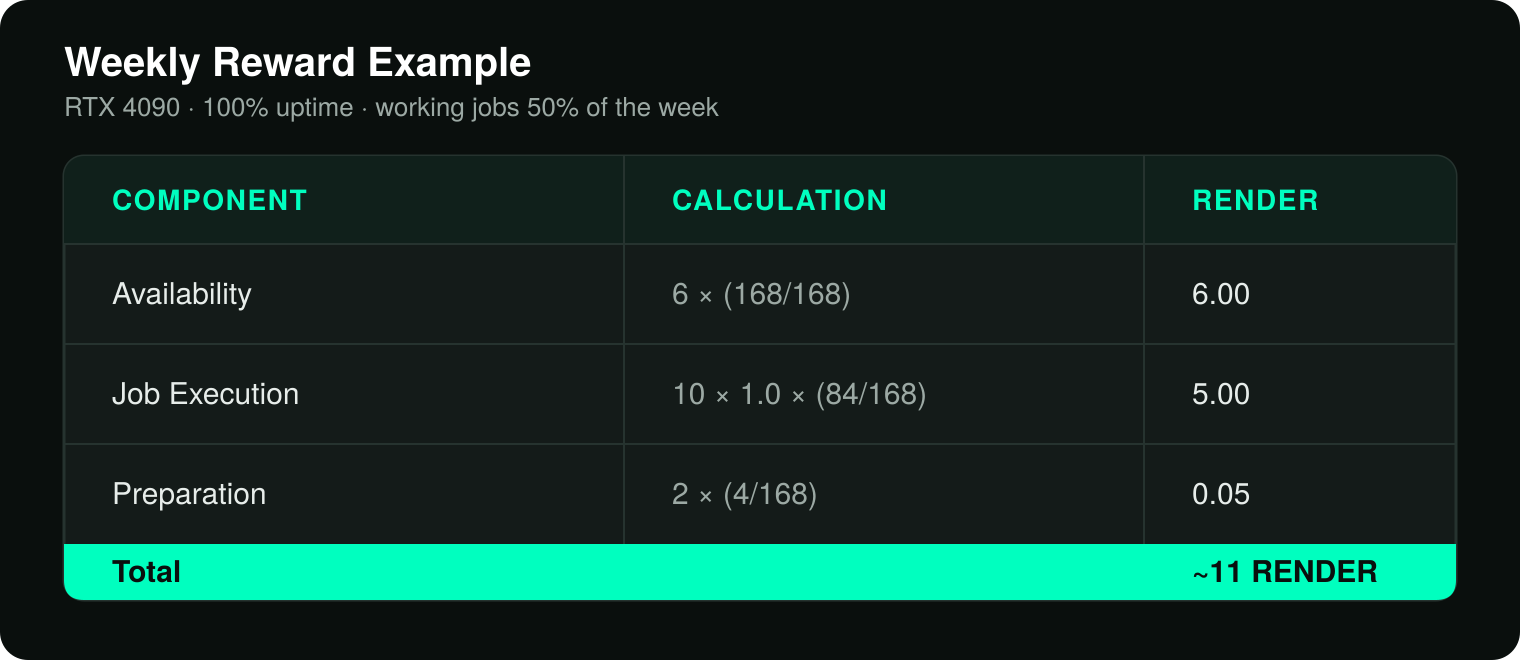
This is the part worth spending some time to understand. The RENDER rewards are not issued as a flat hourly rate. There are three separate components, calculated per weekly Compute Epoch (Sunday 00:00 UTC to the following Sunday):
1. Availability Reward — for keeping your node online and ready, whether or not it's actually assigned work. Maximum 6 RENDER per week at 100% uptime. A node online 50% of the week earns half that.
2. Job Execution Reward — for actually completing work. Base of 10 RENDER per week, scaled by your hardware's Compound Multiplier and the fraction of the week spent actively working. This is the component that depends on demand. Being online doesn't guarantee a job gets assigned to you.
3. Preparation Reward — a smaller component (base 2 RENDER/week) for time spent preparing for jobs, like downloading container images.
A worked example, straight from the math: An RTX 4090 (multiplier 1.0), online 100% of the week, actually working jobs half the time:
Your hardware's multiplier changes the Job Execution number directly. The baseline is the RTX 4090 at 1.0. A few reference points:
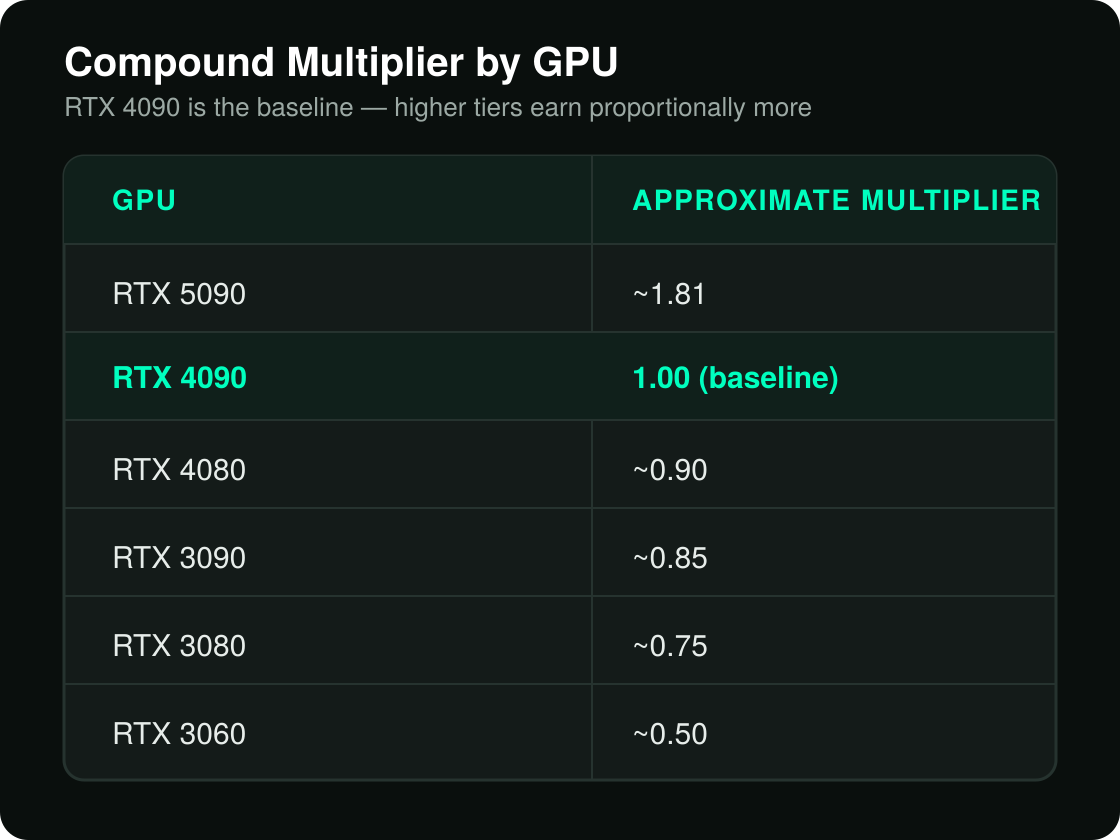
Better hardware earns proportionally more per hour actually worked. The multiplier is calculated from GPU core count, VRAM, network speed, clock speed, memory bandwidth, and CPU, weighted in that order of importance.
Once an epoch finalizes (typically 24-48 hours after it ends), rewards are calculated and queued for distribution. You can track current status and earnings in the Console's Nodes and Rewards sections.
From there, you can keep it in your personal wallet to hold, or move it to another wallet to trade, or sell on exchanges that list RENDER (Binance, Coinbase, and KuCoin are commonly cited).
A few things that actually move the needle, based on how the reward formula works:
Uptime compounds. The availability reward alone rewards simply getting and staying online. This is the most reliable part of your weekly total.
Hardware tier matters most for job execution rewards. If you have more than one machine you’re considering putting on the network, the Compound Multiplier table above is a reasonable proxy for how much more a higher-tier GPU earns per hour of actual work.
A stable connection helps job matching. Network speed is one of the six multiplier factors, and a flaky connection can also mean missed job assignments.
More storage means more job types you're eligible for. Some jobs need more local storage than others to run.
This is genuinely a way to put idle hardware to work rather than letting it sit unused, and the availability reward specifically gives you a predictable floor for simply staying online. What it isn't is a guaranteed monthly income — the job execution component depends on the network actually matching demand to your node, which varies with overall network usage and how your hardware compares to the broader pool. Treat the numbers above as a worked example of the mechanism, not a promise of what your specific setup will earn.
If that tradeoff makes sense for your hardware, which is idle most of the day, otherwise generating nothing, then registering a node costs nothing but the setup time above.


